Friday, September 26, 2014

Dee's Peanut Butter Cup Cheesecake

By popular demand, here is the recipe for Peanut Butter Cup Cheesecake made famous by my mother-in-law.

Dee's Peanut Butter Cup Cheesecake

Crust:
1 1/4 c graham cracker crumbs
1/4 c crushed Oreo cookies
1/4 c sugar
6 tbsp butter, melted

3/4 c creamy peanut butter

Filling:
8, 8 oz pkgs cream cheese, sofened (in a pinch, take off the paper box, and line them up on your stove while you pre-heat the oven for the crust...turn frequently)
1 c sugar
1 c sour cram
3 eggs, lightly beaten
3 tsp vanilla
1 c hot fudge topping, divided
6 peanut butter cups, cut into small wedges (8 per cup)


  1. Pre-heat oven to 350.
  2. Prepare crust
    1. Combine graham cracker crumbs, Oreo crumbs, sugar, and melted butter. (A food processor is handy for this task.)
    2. Press into the bottom of a greased and floured spring form pan. Press up the sides 1 inch.
    3. Place pan on a baking sheet and bake for 7-9 minutes or until set.
    4. Cool on a wire rack.
  3. Place cake pan with water 1/2 way up on the bottom rack of the still hot oven.
  4. In a microwave safe bowl, melt the peanut butter. Spread it over the prepared crust within 1 inch of the edges. Set aside.
  5. In a large mixing bowl, beat cream cheese, sugar, and sour cream until smooth. Add eggs. Beat on low speed just until combined. Stir in vanilla. 
  6. Pour 1 c filling into a bowl, and set aside.
  7. Pour remaining filling over peanut butter and crust.
  8. In a microwave safe bowl, melt 1/4 c hot fudge for 30 seconds or until thin.
  9. Fold into set aside filling.
  10. Carefully spoon over filling and cut with a knife to swirl.
  11. Place pan on baking sheet. Bake for 55-65 minutes or until center is almost set.
  12. Remove cheesecake and water pan (I always forget that guy).
  13. Cool on wire rack 10 minutes.
  14. Carefully run a knife around the edge of the pan to loosen cake.
  15. Cook an additional hour.
  16. Garnish with peanut butter cup wedges, and drizzle with softened hot fudge.
  17. Chill overnight, eat, and become comatose. Serves 12-14. 

Monday, December 16, 2013

Luckily we have extra sheets

Poor poor Katelyn.  I should have known that something was wrong.  When a 2 year old tells you there is an owie in her tummy, she wants to snuggle, and doesn't mind you watching Julia Child...something is up.  She had a long weekend, and didn't fall asleep until almost 10:00 last night, so I thought she was just tired...I. was. wrong.

I started to carry her upstairs enjoying the snuggly toddler in my arms.  I displayed her cuddly cuteness to Al and walked longingly passed the mirror to see the snuggled in kiddo with her head on my shoulder.  Then it happened.

Half way up the stairs she puked.  By the time we reached the top, she had puked again.  By the time we were in the bathroom a third time.  At this point my cardigan, turtleneck, and bra were soaked in puke.  I just stood in the shower while she continued puking.  While Al gathered a bucket and vomit filled my socks, I looked at myself in the mirror...not so cute anymore.

K and I took a bath together, and she went to bed.  She's already been up once sick all over her bed.  Tonight will be a long night...luckily we have extra sheets.

Monday, November 25, 2013

Nancy Owen's Sweet Potato Souffle

Usually I like to post recipes with step-by-step photos, but I wanted to send this out with enough time for people to add it to their Thanksgiving tables.

I was lucky enough to meet Mrs. Owen through my neighbor in Virginia and dear friend Jen.  Jen and I shared a wall for 4 1/2 years, and that wall was barely there most days.  We walked each other's dogs through grad classes, hand infections, and the day-to-day crazy that life brings.  We ran countless miles including a 1/2 marathon, and hosted many fabulous parties using both small apartments' ovens/storage/seating to the max.

Jen's parents would visit on a regular basis, and I was able to get to know Mrs. Owen.  She had raised two intelligent, beautiful, and strong women, and she loved to throw a party as much (or more) as Jen and I did.  Sadly Mrs. Owen passed away earlier this year, and she is dearly missed.

The first time I had her souffle, Jen brought it to a potluck Thanksgiving celebration.  I had two servings with my meal and a third as my dessert.  I didn't think that what she had done to a sweet potato was even legal, but if I was going to go down for buttery, pecan, sweet potato bliss, I was going to make it worth it.  Here is the recipe:

Nancy Owen's Sweet Potato Souffle
3-4 medium to large sweet potatoes
3/4 stick of butter
3/4 c sugar
2 eggs
1/3 c evaporated milk
1 tsp vanilla

Topping:
1 c brown sugar
1 c pecans, chopped
1/2 c flour
1/3 c melted butter

1. Peel and boil sweet potatoes until very soft. Strain.  Pre-heat oven to 375.

2. Mix sweet potatoes, stick of butter, and sugar until smooth.

3. Beat eggs with evaporated milk, and combine with sweet potato mixture.  Add vanilla.

4. Pour into a greased casserole dish.

5. Mix topping ingredients and spread over the top of the souffle.

6. Bake for 1 hour, and serve warm with a smile!

Sunday, November 17, 2013

Advent Calendar

I'm really looking forward to Christmas this year because Katelyn can begin to understand and remember the holiday traditions.  I wanted to have an Advent calendar for her, but I had a long list of criteria: not all chocolate, not too expensive, reusable for next year, sturdy enough that she won't destroy it, and affordable (aka...less than $20).  Pottery Barn had lovely, wood calendars that I couldn't afford, and Pinterest had a lot of ideas that were too easy to destroy.  (Advent would be over in one, big, hit...http://www.pinterest.com/pin/284641638922331930/.)

A friend of mine (hi Kelli) was pinning for her boys.  She found a bunch of cute Advent calendars, but this one caught my eye.

http://www.pinterest.com/pin/20477373279333553/
 This was super cute, but I wanted to incorporate some color and make it reusable.  Here is what I did:

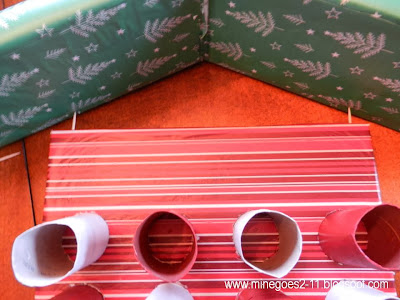
I cut paper towel rolls into thirds and spray painted 1/2 white and 1/2 red.  Boxes helped to keep the spray paint contained.


Next I Mod Podged wrapping paper to 1/2" foam board that I had trimmed to fit the 24 tubes.


I wrapped the paper around the back and used more Mod Podge and tape to secure it.


The Keurig lended a helping hand to drying.  (A Keuring is not necessary for this project, but wine is critical.)


I measured the remaining foam board and used a Wildtree catalog to cut it in half to make the roof.  (Wildtree catalog is not required for this project, but wine is.)


I wrapped each piece in another color wrapping paper.  It is reversable...this is the inside of the paper.


When I wrapped it, I realized that I didn't have enough (I blame the wine), and white would show on the underside of the roof.  Wrapping fail.


No worries.  I cut a piece the same size as the back, and Mod Podged it right on top.  Wrapping win!!


I cut squares of red tissue paper and numbered them 1-24 with a Sharpie.  Make sure to write over something, or you will Sharpie your counters.


Next I put everything out playing with different layouts to see what I liked.  I eventually measured a grid of 24 dots to be the center of each tube.

Grey's Anatomy is as vital to this endevor as wine.

I traced each tube with a small box cutter.


Then I cut on the inside of the circle that I drew with the knife.


I shoved the tube back in to the cut outline to ensure that it fit.  For the 24 red and white tubes, I kept them all in until I was ready to glue.  Keeping them in without glue helped me to line them up.  Once all of the circles were cut, I glued the circle and put the tube back into the slot.


For the red and white tubes, I removed one row at a time, glued one at a time, and replaced it into the pre-cut circle.  Since the tubes aren't perfectly round, the traced circles aren't perfectly round...so it is important to keep each tube with its traced place on the board.


I used toothpicks to create the roof.  I used one toothpick cut in half to connect the two roof pieces, and two toothpicks to connect the roof to the house.  I "pre-drilled" the holes, lined everything up, and removed the toothpicks.


 I put hot glue into the holes, put the toothpicks back into the foam, and pushed the pieces together.


Once everything was shoved together, I used the hot glue to "caulk" the back of the house..keeps the cold air out.


 I gathered up my loot for the gifts.  I only bought the stickers, necklaces, and bracelets.  I found the jewelry in the party favor section of Target.  The rest of the items I had around the house and included: sparkly letter stickers, foam hearts, and leftover Halloween candy.  I shoved them in the tubes, covered them with the numbered tissue squares, and secured with a rubber band.

Using Halloween candy for the Advent calendar...parenting win!
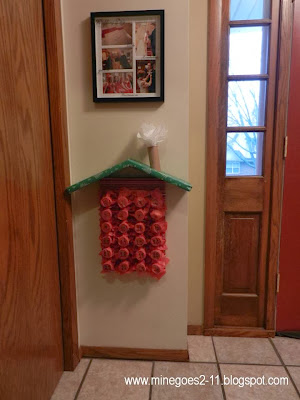
Finally I dug a hole in the back with the knife, hammered a nail in the wall, and hung up the calendar.


It is sitting at the bottom of the stairs so she sees it every morning, but is in the gated off section of the house, so she won't be able to raid the goods with my back turned.


In addition to wine, this project requires good supervision...

"Could you get us some more pillows...or perhaps a peanut butter cocktail??"
This project cost $10 ($5 foam board and $5 for gifts...I had the rest of the supplies), two naps, and one evening's worth of work.  It took longer than expected, but I'm happy with the way it turned out.

Sunday, August 25, 2013

House Party with Keurig

A few months ago I started seeing ads on TV that weren't ads.  "House Party with Keurig"...and there would be smiling women with a Keurig coffee maker in a random kitchen...then it was over and onto the next commercial.  "Wait...what the F was that??  That wasn't a commercial!"  I thought that I must have misunderstood.  So the next time it came on TV, I really paid attention.   Keurig...women...coffee...kitchen...W.T.F???  It still made no sense at all.  Then I started seeing the ads on my Facebook feed.  The non-ad was following me!!  The only logical conclusion was to click on it.
After filling out my address and a survey, I found out that House Party sends different products to a host's house for them to share with their friends.  I applied for the Keurig party, and a few weeks later was accepted to host!  The only rules were that I needed to invite 10 people via email, take a photo of the party, and agree to give away a Keurig...no problem.  I received two Keurigs in the mail and a huge box of coffee and Keurig swag.

Today a great group of friends came over to our house.  This was NOT your typical Tupperware party.  I couldn't decide what kind of scones to make, so I made raspberry with white chocolate chips, toffee and chocolate chips, and cinnamon chip.

 Al made a brilliant pyramid of Keurig iced coffee/tea sippy cups.


The big prize was set out in the center of the living room with a pretty red bow.

Super fast Guinness
Not only did the guests get free coffee, free scones, free swag, and a chance for a free Keurig, they also got a coupon for 50% off a Keurig brewer.  I of course created my own side by side comparison of each Keurig available with the features and price with discount.

It is normal to create product comparisons complete with logo...yes?
We all grabbed a coffee or tea (iced or hot...some with Bailey's or Kahlua).

Decisions...decisions...decisions...
Then we needed a way to give away the Keurig.  Al wanted to be sure that he had influence over the great power that we had of determining the lucky winner of the Keurig.  Clearly the only option was to play two rounds of Cards Against Humanity..."the card game for horrible people".  Everyone had a great time!


Ben was the big winner for the day.  He took an early lead, and nobody was able to catch up.  Congratulations Ben and Shanna on your new Keurig!!

The happy couple with their new Keurig!
It was a great afternoon with friends, coffee, and CAH...also not a bad day when you get a free Keurig!  I've applied to host a Yellow Tail Moscato party...how awesome would that be??  Keep your fingers crossed for me!

Thursday, August 22, 2013

Irish Dumplings

Here's one of my favorites for a cool day.  I used Penzey's Spices "Mural of Flavor", but you can use any herb blend.

2 cans reduced fat condensed cream of chicken soup
3 cups water
3 medium onions
1 package carrots
1 package celery
salt and pepper
2 tbsp Penzey's Mural of Flavor (or other herb blend)
family pack of boneless, skinless chicken breasts or thighs
6 medium potatoes, peeled
1 package frozen peas
3 cups Bisquick
1 cup low-fat buttermilk
1/3 c fat-free half and half or low fat milk

Sprinkle boneless, skinless chicken breasts and/or thighs with the seasoning, salt, and pepper.  Bake at 350 for 15-25 minutes until the center is 165 degrees.


Chop carrots, celery, and onions into equal sized pieces.


Heat olive oil in a large pot.


Cook the veggies with salt and pepper for 10 minutes on medium high heat.


Remove chicken from the oven.


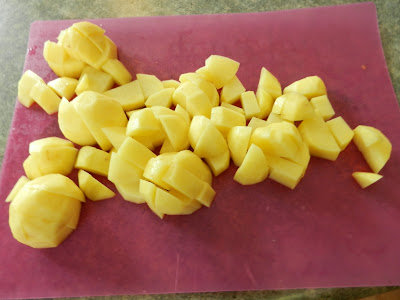
Chop potatoes into 1" pieces.


Add soup, water, potatoes, peas, and chicken to the pot and simmer for 30 minutes.


I noticed that the chicken pan had all sorts of tasty goodness stuck on it...and I want ALL of the tasty goodness!


I took two ladles of the broth, fired up two burners, and deglazed the pan.


Scrap the pan with a wooden spoon using the broth to clean off the cooked on pieces.


Drain the liquid into the pot, and now you've not only put all of that flavor into the stew, but you've cleaned most of the pan!


Mix up the Bisquick, buttermilk, and milk to create the dumplings.


Plop them into the pot in small batches turning after 2 minutes to cook all sides.


Enjoy!  This is a great meal to double and put half in the freezer.  You can also put it into small containers and make all of your coworkers jealous with your awesome leftovers.


Sunday, June 2, 2013

Flowers, flowers, flowers!

 The veggies have already been planted, and the tulips have come and gone, so it was time to plant some annuals.  Last year I planted what I thought were annuals in the front yard.  They had cute, little, red flowers.  My only complaint was that they weren't very big.  Turns out they were perennials because they came right back up twice as big as last year.  Only one of them has new flowers, but the rest should be in soon.  I planted a flat of white impatiens around them.  Hopefully it all fills in soon.


For the flowers around our lamp-post, I went a little nuts.  I wanted to add another color to the mix besides red and white.  These cute little neon flowers caught my eye, and I went for it.


Then because I wasn't tired of digging yet, I decided to move some hostas.  I usually hate hate hate hostas, but these weren't so bad because they were solid colored and weren't the size of a small bus.   I didn't take a before picture (because I suck), but they were to the right in the grass.  Al would have to mow around them.  The mulched area by the sidewalk was completely empty.  I moved them over, dug up some rouge grass, and replaced the hostas with grass.


My supervisors tell me that I'm doing it wrong.
On a random note, I'm in love with my new foundation.  I decided to spend a little more money than the drug store, and I'm really happy.  This is 8 hours after I applied it with no touch ups and 3 hours of gardening.